Change weather
Presets
Bifrost provides a diverse selection of weather presets that serve as a starting point for customizing your environment. Each preset defines a baseline configuration of weather conditions, making it easy to set up a scene with a desired look and feel quickly.
Attention
Weather presets are designed for use with non-satellite worlds.
Selecting presets
To browse the available presets, click Environment in the bottom drawer.
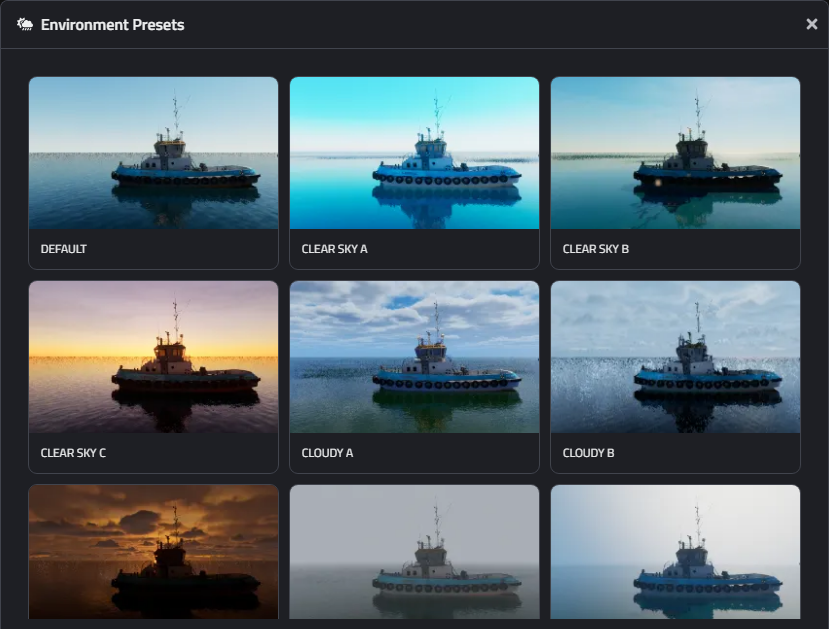
Presets are organized into categories such as Clear Sky, Partly Cloudy, and Cloudy, each representing a different overall weather condition.
Within each category, individual presets are labeled with suffixes like A, B, C, and so on.
These suffixes indicate the sun elevation associated with the preset, with A being the lowest and H the highest.
To preview how a preset looks, hover over its card and click the Preview button. The viewport will update immediately to display the selected preset in action. Use this feature to quickly compare different weather conditions and choose the one that best fits your scene.
Applying presets
After you have explored and picked your preferred presets, click the Select button to add them to your selection. You can mix and match multiple different presets, so try to cover the range of conditions you expect to see in your use case.
When you are happy with your selection, click the
Copy button.
This will copy the selected preset names to your clipboard, so you can easily paste it into your Jupyter cell and start applying the presets in your scene.
env_presets = [
    "clear_sky_a",
    "cloudy_a",
    "partly_cloudy_a",
]

world.env.set_preset(env_presets[0])

# add this for randomized scenarios
world.env.configure_preset_randomization(
    env_presets,
    with_variations=True
)
Command |
Description |
|---|---|
|
Assign the selected presets to a variable. |
|
Applies a preset to the environment. |
|
Sets up the presets to be used during For example, cloud density and pattern vary slightly, sun elevation shifts subtly between frames, and sun azimuth is randomized between 0-360°, keeping scenes visually consistent yet less repetitive. |
Attention
For time series scenarios, please skip to the Manual weather control section for more details on how to control weather parameters manually.
Note
The preset selection process follows a balanced batching strategy, with each preset applied to several consecutive frames before moving on to the next one.
In practice, the total number of frames is divided as evenly as possible among the available presets. If the frames do not divide evenly, earlier presets earlier presets may be assigned slightly more frames.
For example, if you have 3 presets and 10 frames, the presets will be applied in the following order: AAAA BBB CCC.
This is done to optimize generation performance.
With that, you are ready to begin the rendering process. If you require more fine-grained control over the weather, continue to the next section for detailed customization options.
Customization on top of presets
If the default variations provided by the presets do not fully match your use case, you can manually override individual weather parameters with specific values.
For example, if you want to always keep the sun positioned in front of the camera, you can do the following:
env_presets = [
    "clear_sky_a",
    "cloudy_a",
    "partly_cloudy_a",
]

world.env.set_preset(env_presets[0])
world.env.configure_preset_randomization(
    env_presets,
    with_variations=True
)

scenario = world.new_scenario(num_frames=10)

for frame_idx in range(scenario.num_frames):
    scenario.set_keyframe(
        world.env.weather,
        frame_idx,
        sun_azimuth=rng.uniform(0, 180),
    )
Manual weather control
Attention
This section is only relevant for time series scenarios or when you do not want to randomize across presets.
Important
It is still recommended to start with a preset that closely matches your desired scene. This provides a strong baseline, making manual adjustments easier and more consistent.
There are two main ways to manually control weather parameters:
Command |
Description |
|---|---|
|
Use scenario keyframes to animate the weather parameters over time. The effects are not immediately visible in the viewport, but you can preview them using
|
|
Set a weather parameter to a specific value. This takes effect immediately and is visible in the viewport. However, the parameter can be overridden by a keyframed value. |
world.env.set_preset("clear_sky_a")

# fix cloud coverage and drift
world.env.weather.set_cloud_coverage(2)
world.env.weather.set_cloud_drift(10)

scenario = world.new_scenario(num_frames=10)

for frame_idx in range(scenario.num_frames):
    # randomize sun azimuth and elevation
    scenario.set_keyframe(
        world.env.weather,
        frame_idx,
        sun_azimuth=rng.uniform(0, 180),
        sun_elevation=rng.uniform(60, 90),
    )