Coordinate system
Every object in BBI has a defined spatial orientation, described by its position and rotation.
Both are represented using the Vector3 class.
In this guide, we will walk through how the coordinate system works.
Position
The position of an object describes where it is in the world.
You can think of the world as a 3D Cartesian coordinate system, with the origin located at (0, 0, 0).
BBI uses a left-handed coordinate system, where
- +X - forward
- +Y - right
- +Z - up
Tip
Use the gizmo at the bottom left of the viewport to visualize the orientation of the world axes.
Each unit in this space represents one metre, allowing you to position objects with precision.
For example, an object at Vector3(5, -3, 8) is located 5m forward, 3m to the left and 8m up from the world origin.
Note
An asset’s position is defined at its pivot point. This may differ from the asset’s geometric centroid.
Attention
The world coordinate system in BBI is abstract and does not correspond to any real world geographic reference or location.
Rotation
The rotation of an object defines which way it is facing in the world.
Similar to position, rotation is also represented using Vector3,
where each component defines a rotation around one of the three world axes.
Vector3 Component |
Rotation Type |
Rotates Around |
Analogy |
Positive Direction |
|---|---|---|---|---|
X |
Roll |
X-axis |
Airplane tilting its wings |
Clockwise Right wing down, left wing up |
Y |
Pitch |
Y-axis |
Airplane nose moving up/down |
Up Nose up, tail down |
Z |
Yaw |
Z-axis |
Airplane turning left/right |
Right Turn right |
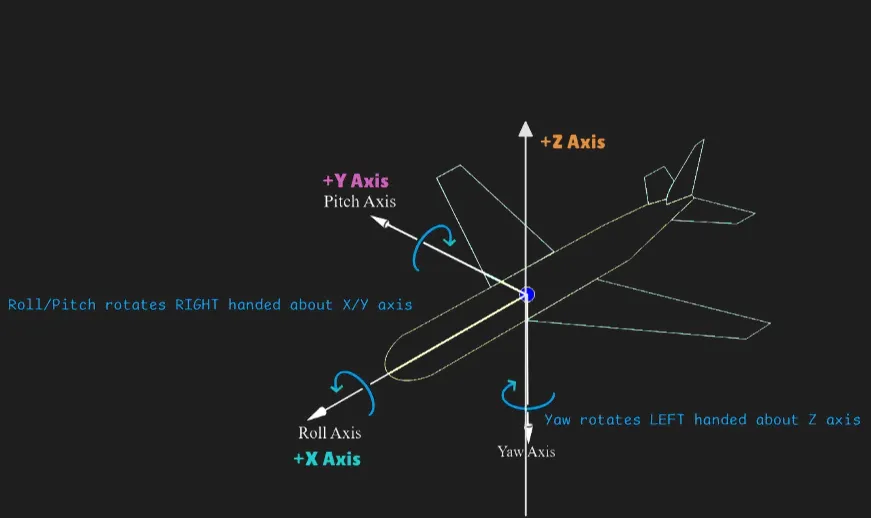
All rotation values are expressed in degrees.
Rotations are applied in the following order:
Yaw (Z) -> Pitch (Y) -> Roll (X)
For example, an object with a rotation of Vector3(10, -5, 30) will
Turn right by 30° (Yaw)
Look down by 5° (Pitch)
Tilt right by 10° (Roll)
Relative transform
Up to this point, we have been working with absolute position and rotation, where an object’s transform is defined directly in world space. However, many workflows benefit from describing an object’s transform relative to another object instead.
A relative transform specifies how an object is positioned and oriented with respect to its parent, rather than the world origin. This makes it easy to:
maintain stable offsets between related objects
move groups of objects together
There are two main ways to work with relative transforms.
Attachment
Attachment is the preferred method for working with relative transforms. When an asset is attached to a parent, moving the parent automatically moves all of its children.
To attach an asset and give it a relative transform:
Use
asset.attach_toto attach the child asset to the parent.Use
asset.set_relative_transformto define the child’s transform relative to the parent.
Once attached, the child asset inherits the parent’s transform and updates automatically as the parent moves or rotates.
parent = Asset(
    node_id="parent", asset_name="", position=Vector3(0, 0, 0), rotation=Vector3(0, 0, 0)
)
world.add(parent)

child = Asset(
    node_id="child", asset_name="", position=Vector3(0, 0, 0), rotation=Vector3(0, 0, 0)
)
world.add(child)

# Attach child to parent
# Both child and parent must be added to the world before attaching
child.attach_to(parent)

# Set child's transform relative to the parent
child.set_relative_transform(
    Transform(position=Vector3(5, 0, 0), rotation=Vector3(0, 0, 45))
)
print(child.position)  # Vector3(5, 0, 0)
print(child.rotation)  # Vector3(0, 0, 45)

# Move and rotate the parent
parent.set_transform(
    Transform(position=Vector3(10, 0, 0), rotation=Vector3(0, 0, 30))
)
print(child.position)  # Vector3(14.33, 2.5, 0.0)
print(child.rotation)  # Vector3(0, 0, 75)
Tip
Relative position uses the same axis conventions as world coordinates, but applied in the parent’s local coordinate system:
A positive x moves the object forward from the parent.
A positive y moves it to the right of the parent.
A positive z moves it up from the parent.
Computing relative transforms manually
If you prefer not to use attachments, you can manually compute the relative transform by applying it directly to the parent’s transform using bbi.transform.Transform.apply_relative_transform().
parent = Asset(
    node_id="parent", asset_name="", position=Vector3(10, 0, 0), rotation=Vector3(0, 0, 30)
)

relative_transform = Transform(
    position=Vector3(5, 0, 0), rotation=Vector3(0, 0, 45)
)

# Convert the relative transform into a world-space transform
child_transform = parent.transform.apply_relative_transform(relative_transform)
print(child_transform.position) # Vector3(14.33, 2.5, 0.0)
print(child_transform.rotation) # Vector3(0, 0, 75)
Tip
Use manual relative transform calculation when you need the result once, such as computing an offset position for spawning, raycasting, or intermediate geometry.
This method does not create a persistent parent-child relationship, so moving the parent later will not automatically move the child.